
AWS Budget Alert
AWS ကို အသုံးပြုနေစဉ် မေ့ပြီးမဖျက်လိုက်မိရာက Fee တွေဖြတ်သွားတာမျိုးဖြစ်တတ်ပါတယ်။အဲ့လိုမဖြစ်ရလေအောင် AWS BILLING AND COST MANAGMENT ရဲ့ အဆက် simple Budget alert အကြာင်းလေး မျှဝေပေးချင်ပါတယ်။
Budget alert လေးလုပ်ထားတဲ့အခါ သတ်မှတ်ထားတဲ့ ငွေပမာကို ရောက်တဲ့အခါ ကိုယ် သတ်မှတ်ထားတဲ့ နည်းလမ်းနဲ့ အကြောင်းကြားပေးမှာဖြစ်တဲ့အတွက် တော်တော်လေးအဆင်ပြေပါတယ်။
Zero Spent Budget Alert
သူကတော့ free tier သို့ personal account တွေမှာ လုပ်ကို လုပ်ထားသင့်ပါတယ်။
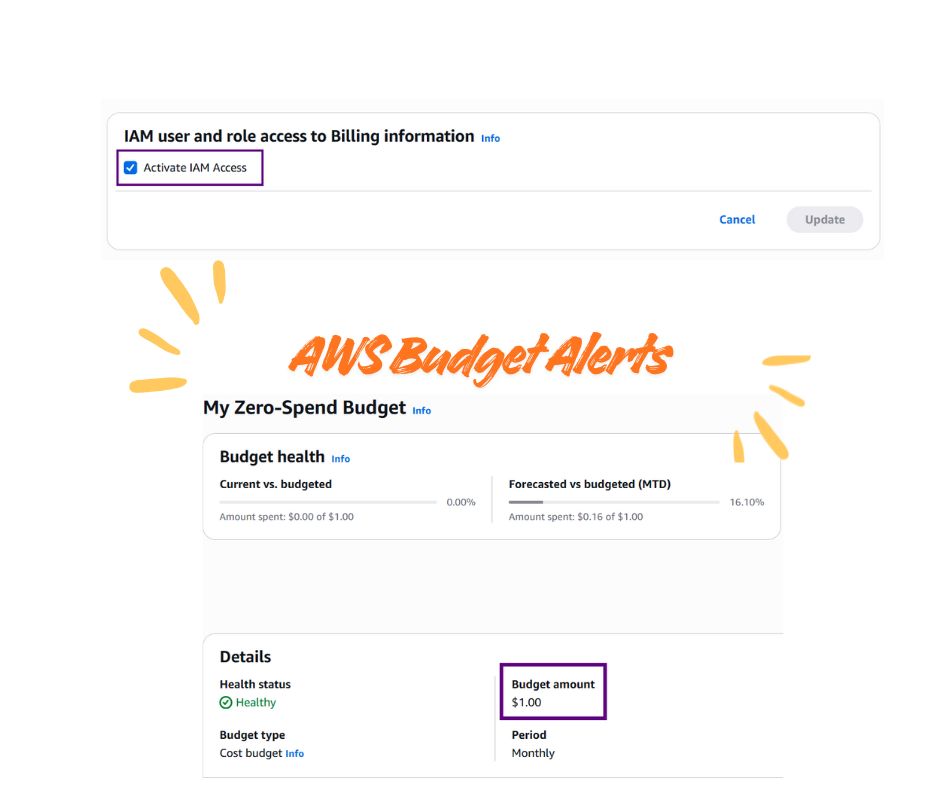
အရင်ဆုံး IAM users တွေကို billing information ကို access လုပ်နိုင်အောင် Root account နဲ့ IAM billing access ကို Activate အရင်ဆုံး လုပ်ပေးရပါမယ်။
AWS Console ကို Root Account နဲ့ login in ၀င်ကာ Account Settings သို့ သွားပြီး Activate IAM Access to Billing Information ကို Enable လုပ်လိုက်ပါမယ်။
ထို့နောက် Usage alerts ကို လက်ခံချင်တဲ့ Email address ကို ထည့်ပြီး Free Tier နှင့် billing notifications တွေကို ဖွင့်ထားလိုက်ပါမယ်။
Billing Console မှ Preferences ကိုသွားကာ Receive Billing Alerts နဲ့ Receive Free Tier Usage Alerts Option တွေကို Enable လုပ်လိုက်ပါမယ်။ Alert လက်ခံလိုသော Email Address များကို add လိုက်ပါမယ်။
နောက်ဆုံးအနေနဲ့ AWS Budgets ကို အသုံးပြုပြီး Zero spend budget Alert တစ်ခုကို create လုပ်လိုက်ပါမယ်။Billing and Cost Management သို့ သွားကာ Budgets မှတဆင့် Create budget
- Budget setup : Use a template ကို ရွေးပါ
- Template : Zero spend budget ကို ရွေးပါ
- Budget Details: Budget name (Zero-Spend-Budget-Alert) & Email recipients
Alert လက်ခံလိုသော Email Address ကို ထည့်ကာ Create လုပ်လိုက်ရင်တော့ $0.01 ထက်အသုံးပြုပါက Email နဲ့ အကြောင်းကြား ပေးနိုင်ပါပြီ။
Monthly Cost Budget
Zero Spend အပြင် Monthly alert ပါလုပ်ထားပြီး တွဲသုံးနိုင်ပါတယ်။ လုပ်မယ် ဆိုရင်တာ့ (Threshold amount)ကိုသတ်မှတ်ပေးရပါမယ်။ အဲ့တာဆို အဲ့ တာရဲ့
- 85% ကို ရောက်ရှိလာတဲ့အခါ
- 100% ကို ရောက်ရှိလာတဲ့အခါ
- Forecasted spend က 100% ရောက်ရှိလာတဲ့အခါ တွေမှာ
အကြောင်းကြားပေးမှာဖြစ်ပါတယ်။
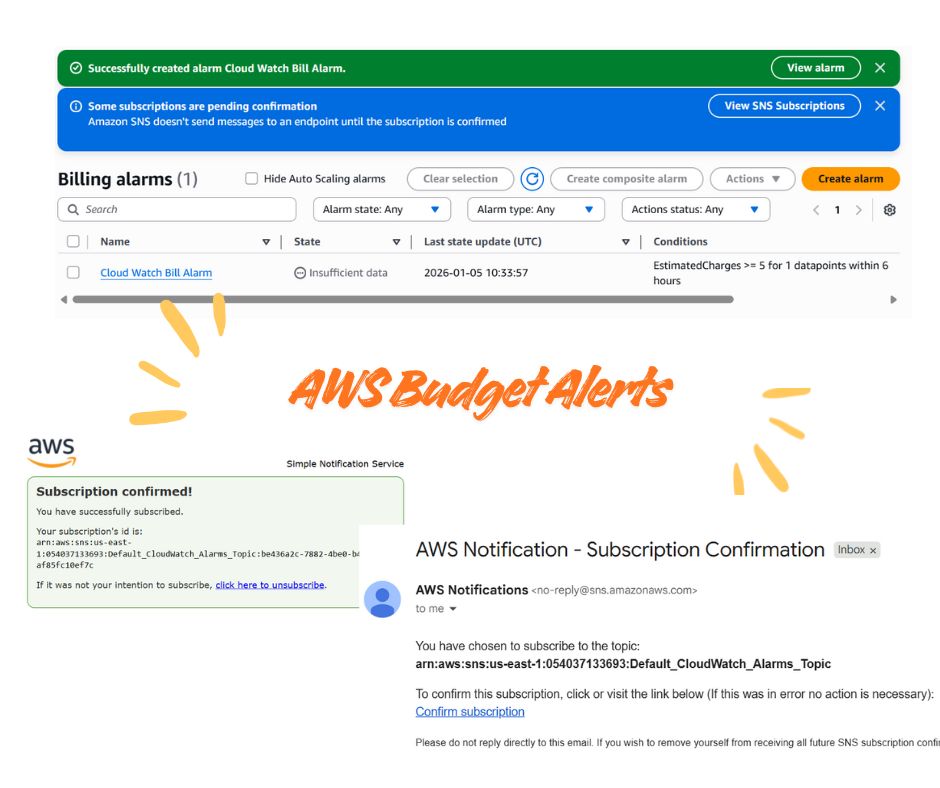
AWS Cloud Watch Billing Alert
Amazon CloudWatch ကို SNS နဲ့ တွဲသုံးကာ simple Alert လေး လုပ်ကြည့်ပါမယ်။ Cloud Watch Billing Metric က N. Virginia (us-east-1) မှာပဲရှိတဲ့အတွက် region အရင်ဆုံး မဖြစ်မနေ ချိန်းထားပေးရပါမယ်။
အဲ့အတွက် CloudWatch Console မှတစ်ဆင့် Alarms ကိုသွားကာ Billing Alarm ကို create လုပ်ပါတယ်။
Specify metric and conditions မှာ
ဥပမာ ။
- metric name : my alert
- currency : USD
- statistic : maximum
- Period : 6 hours
- Threshold Type: Static
- Condition: Greater than or Equal to
- Threshold Amount: 100
ဆိုလိုတာက CloudWatch Billing Alarm က EstimatedCharges (စုစုပေါင်းခန့်မှန်းကုန်ကျစရိတ်) ကို ၆ နာရီတိုင်း evaluate လုပ်ပြီး သတ်မှတ်ထားသော threshold amount ထက် ကြီးသွားပါက alarm ပို့ပေးပါသည်။
Email နဲ့ပိုစေချင်တာဆိုတော့ SNS notification ရဲ့ Configure actions မှာ
- Alarm State: In alarm
- SNS Topic: Create new topic ကို ရွေးပြီး
- Email Address ထည့်သွင်းပါ
- Alarm Name ကို သတ်မှတ်ပါ
အဲ့ steps တွေပီးရင်တော့ ထည့်ထားတဲ့ email တွေမှာ AWS ပို့တဲ့ notification confirmation လုပ်ပေးရပါမယ်။
ပြီးတော့ AWS Budgets alert က real-time မဟုတ်တဲ့အတွက် အချိန်နောက်ကျနိုင်တာလေးတွေ၊ Cloud Watch ကBilling metric က Region မမှန်ရင် မမြင်ရတာလေးတွေကိုတော့ရှိပါတယ်။
အသေးစိတ်ကိုတော့ အချိန်ရရင် AWS Documentation မှာ လေ့လာနိုင်ပါတယ်။ Happy New Year par! ကျေးဇူးတင်ပါတယ်။
Discussion
Join the conversation
How do you feel about this article?
Comments
Sign in to join the conversation
Sign in to be the first to comment!
Share Your Article
Share with your professional network
Recent Articles

AWS - Application Load Balancer
Elastic Load Balancing (ELB) ELB ဆိုတာကတော့ request တွေကို တစ်နေရာတည်းမှ လက်ခံကာ Amazon EC2 instances၊ containers, etc.....
Terraform Day 3: Benefits of Terraform State
Terraform ကိုလေ့လာ တဲ့အခါ ကျွန််တော်တို့ရဲ့ Project Folder ထဲမှာ terraform.tfstate ဆိုတဲ့ ဖိုင်လေးကို တွေ့ဖူးကြပါလိမ့်မယ...

Terraform Day 2: Essential IaC Principles You Must Know
မနေ့ကတော့ Terraform အကြောင်း အကြမ်းဖျင်း Concept ကို ပြောပြခဲ့ပြီးပြီဆိုတော့ ဒီနေ့မှာတော့ Terraform ကို Professional ကျက...
TCP/IP Protocol
အားလုံးပဲမင်္ဂလာပါ။ ဒီနေ့ ကျွန်တော်တို့ TCP/IP Protocol အကြောင်း ဆွေးနွေးသွားပါမယ်။ ပထမဆုံးအနေနဲ့ TCP/IP ရဲ့ History လေး...

Terraform Day 1: Introduction to IAC and Terraform
ကျွန်တော်တို့ cloud အကြောင်း စပြောကြပြီဆိုရင် အရင်ဆုံး ခေါင်းထဲရောက်လာတာ Console ထဲဝင်၊ UI ကနေ ခလုတ်လေးတွေ လိုက်နှိပ်ပြီ...