Production Grade AKS Secret Management Using Azure Key Vault and Managed Identity
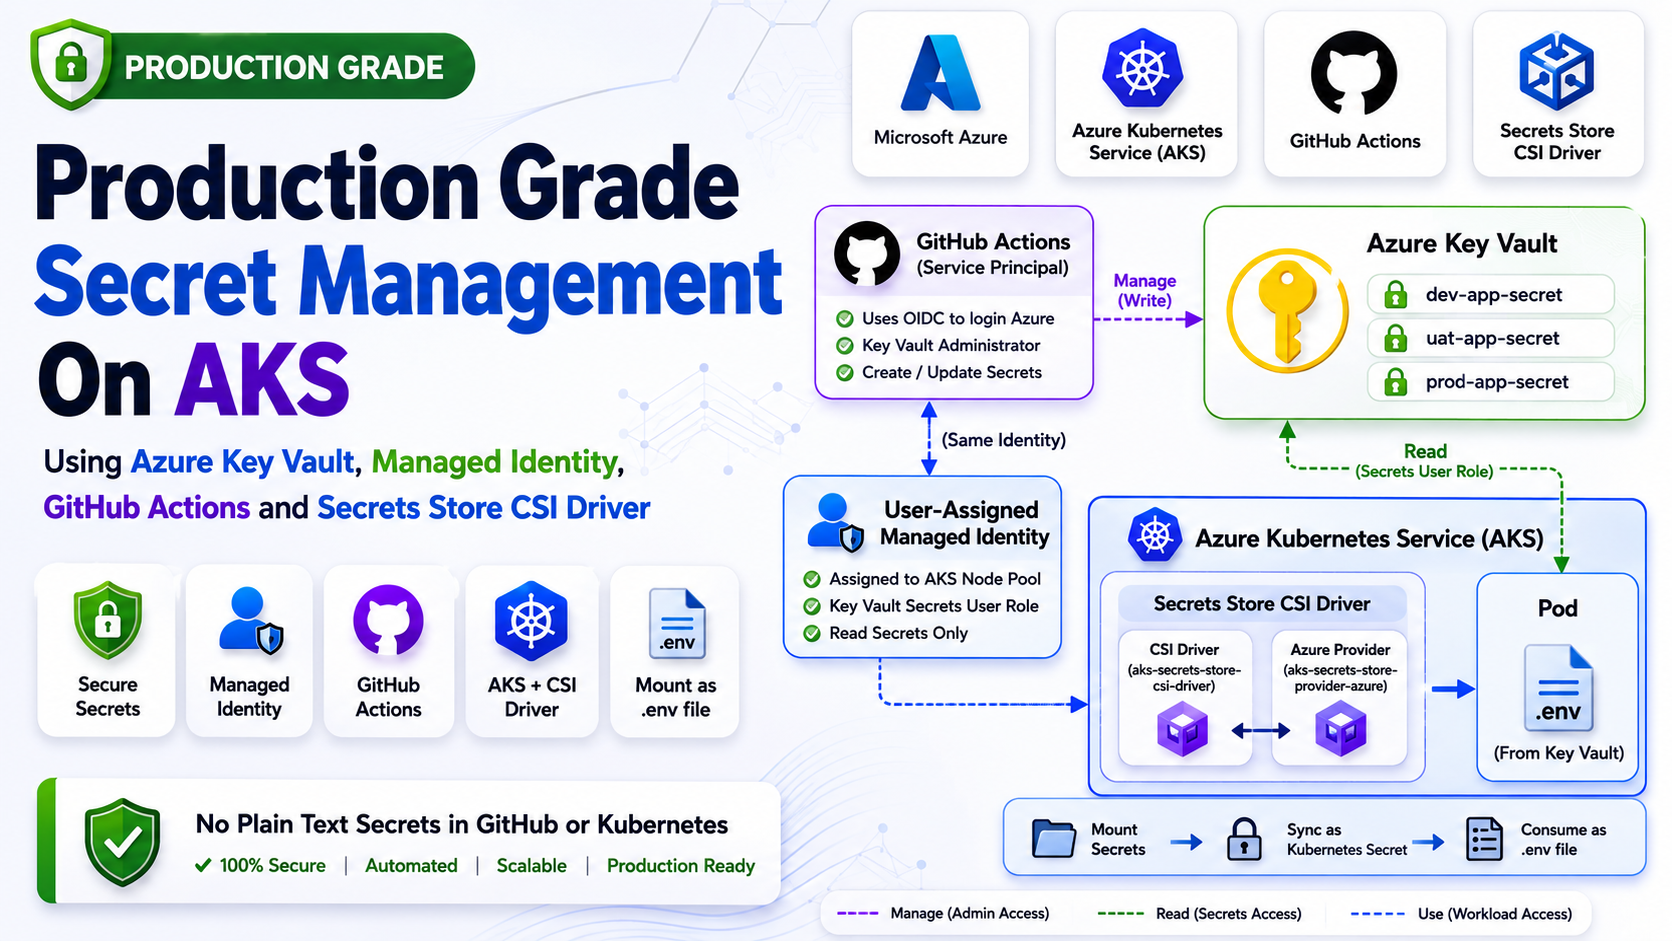
ကျွန်တော်တို့ Application တွေမှာ အသုံးပြုတဲ့ ".env" (Sensitive Data) တွေကို secure ဖြစ်အောင် manage လုပ်ဖို့ဆိုတာ DevOps တစ်ယောက်အတွက် တကယ့်ကို အရေးကြီးတဲ့ အလုပ်တစ်ခုပါ။ Infrastructure ပုံစံတွေ၊ Tech Stack တွေ မတူရင် သိမ်းဆည်းပုံချင်း ကွဲနိုင်ပေမယ့် ကျွန်တော် AKS မှာ သုံးထားတဲ့ design ကတော့ တော်တော်လေး အဆင်ပြေတာမို့ share ပေးလိုက်ပါတယ်။
ဒီ design ရဲ့ အဓိက ရည်ရွယ်ချက်ကတော့ ကျွန်တော်တို့ရဲ့ sensitive data တွေကို GitHub ထဲမှာဖြစ်ဖြစ်၊ Kubernetes ထဲမှာဖြစ်ဖြစ် Plain Text အနေနဲ့ လုံးဝ မထားချင်တာ က စတာပါ။
တချို့လူတွေက Kubernetes Secret ကိုသုံးထားရင် secure ဖြစ်ပြီလို့ထင်တတ်ပါတယ်။ ဒါပေမယ့် Kubernetes Secret ဆိုတာ Base64 Encode လုပ်ထားတာပဲဖြစ်ပြီး Encryption မဟုတ်ပါဘူး။ Cluster Access ရှိတဲ့သူတစ်ယောက်က Secret Value ကို အလွယ်တကူ decode ပြန်လုပ်နိုင်ပါတယ်။
ဒါကြောင့် Production Environment တွေမှာတော့ Secret Management ကို Kubernetes အပြင်ဘက် Dedicated Secret Manager တစ်ခုထဲမှာထားတာက ပိုကောင်းပါတယ်။ Azure Environment မှာဆိုရင် Azure Key Vault က အရမ်းအသုံးဝင်ပါတယ်။
ဒီ article မှာတော့ ကျွန်တော် Production AKS Cluster တွေမှာ တကယ်အသုံးပြုနေတဲ့ Secret Management Architecture ကို အစအဆုံး breakdown လုပ်ပြီး ရှင်းပြသွားမှာပါ။
ဒီ Design ထဲမှာ အသုံးပြုထားတဲ့ Components တွေကတော့ -
- Azure Kubernetes Service (AKS)
- Azure Key Vault
- User Assigned Managed Identity
- GitHub Actions OIDC
- Terraform
- Secrets Store CSI Driver
- Stakater Reloader
- Kubernetes Secret Sync
တို့ပဲဖြစ်ပါတယ်။
Overall Architecture
ဒီ Design ရဲ့ Overall Flow ကို အရင်ဆုံးကြည့်လိုက်ရအောင်။
1GitHub Secrets2 ↓3GitHub Actions OIDC4 ↓5Terraform + Azure CLI6 ↓7Azure Key Vault8 ↓9User Assigned Managed Identity10 ↓11Secrets Store CSI Driver12 ↓13Kubernetes Secret14 ↓15Application Pod (.env)ဒီ Architecture ရဲ့ အဓိက Goal ကတော့ -
1Never store production secrets directly inside GitHub repository or Kubernetes manifests.ဆိုတဲ့ Concept ပါပဲ။
Environment Separation
Production Infrastructure တွေမှာ Environment Isolation က အရမ်းအရေးကြီးပါတယ်။ Dev Secret က Production ထဲမရောက်သင့်သလို Production Secret ကလည်း Dev Environment မှာ မရှိသင့်ပါဘူး။
ဒါကြောင့် Azure Key Vault ကို Environment အလိုက် သီးသန့်ခွဲထားပါတယ်။
1mbr-kv-dev2mbr-kv-uat3mbr-kv-productionဒီလိုခွဲထားတဲ့အတွက် -
- RBAC ခွဲလို့ရတယ်
- Audit Log ခွဲလို့ရတယ်
- Blast Radius လျော့သွားတယ်
- Environment Isolation ပိုကောင်းလာတယ်
- Access Control သီးသန့်ထားလို့ရတယ်
Production Environment မှာ ဒီလို Separation က အရမ်းအရေးကြီးပါတယ်။
Why Terraform?
Vault တွေကို Azure Portal ကနေ Manual Create မလုပ်ဘဲ Terraform နဲ့ပဲ Manage လုပ်ပါတယ်။
Production Infrastructure တွေမှာ Manual ClickOps သွားတာထက် Infrastructure as Code သွားတာက ပိုကောင်းပါတယ်။
Terraform သုံးထားတဲ့အတွက် -
- Reproducible Infrastructure
- Git Version Control
- Review Process
- Pull Request Approval
- Consistency
- Automation
- GitOps Workflow
တို့ကို ရရှိပါတယ်။
ဥပမာ Azure Key Vault Resource:
1resource "azurerm_key_vault" "this" {2 name = "mbr-kv-dev"3 location = azurerm_resource_group.this.location4 resource_group_name = azurerm_resource_group.this.name5 tenant_id = var.tenant_id6 sku_name = "standard"7 8 purge_protection_enabled = true9}ဒီနေရာမှာ "purge_protection_enabled" က Production မှာ အရမ်းအရေးကြီးပါတယ်။
Vault ကို Accidentally Delete ဖြစ်သွားရင် Recovery ပြန်လုပ်နိုင်ဖို့ Purge Protection Enable လုပ်ထားတာပါ။
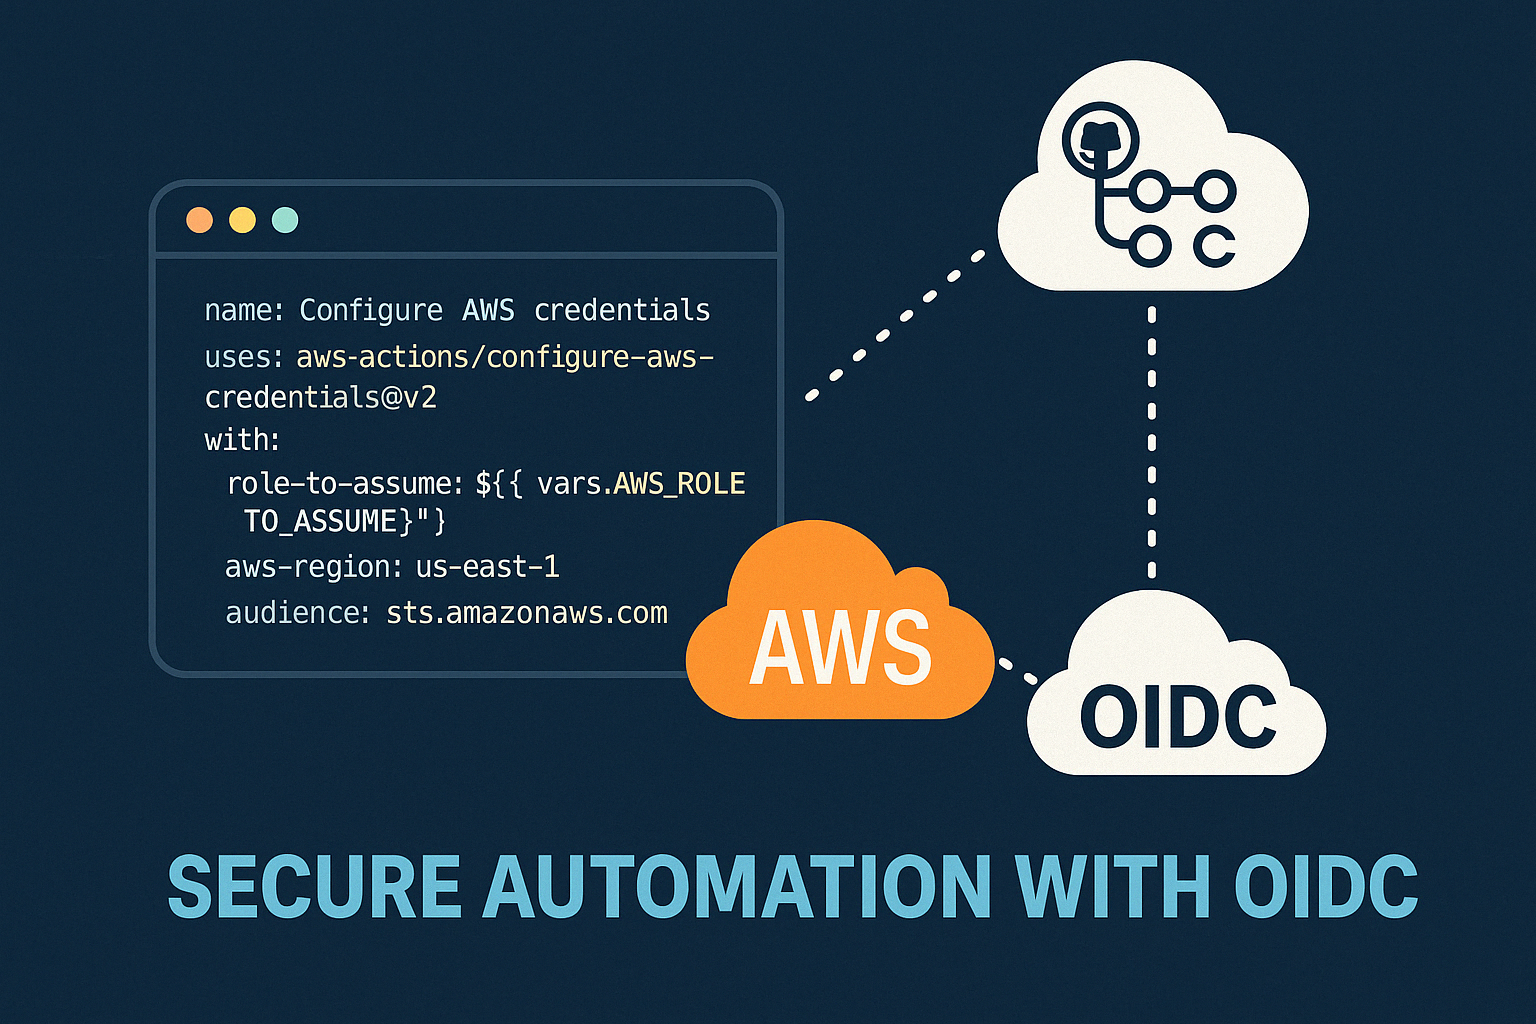
GitHub Actions OIDC Authentication
ဒီ Architecture ရဲ့ အရေးကြီးဆုံးအပိုင်းတစ်ခုက OIDC Authentication ပါ။
တချို့ Project တွေမှာ GitHub Secrets ထဲမှာ Azure Client Secret သိမ်းထားတာတွေ့ရတတ်ပါတယ်။
1AZURE_CLIENT_SECRETဒါပေမယ့် Long Lived Secret တွေကို GitHub ထဲမှာ သိမ်းတာက Security Risk ရှိပါတယ်။ Secret Leak ဖြစ်သွားရင် Azure Environment တစ်ခုလုံး compromise ဖြစ်နိုင်ပါတယ်။
ဒါကြောင့် ကျွန်တော်က GitHub Actions OIDC Authentication ကို အသုံးပြုပါတယ်။
Workflow:
1permissions:2 id-token: write3 contents: readAzure Login:
1- name: Azure Login2 uses: azure/login@v23 with:4 client-id: ${{ secrets.AZURE_CLIENT_ID }}5 tenant-id: ${{ secrets.AZURE_TENANT_ID }}6 subscription-id: ${{ secrets.AZURE_SUBSCRIPTION_ID }}ဒီ Design ရဲ့ အားသာချက်တွေကတော့ -
- No Client Secret
- Federated Authentication
- Temporary Credentials
- Better Security
- Azure Native Authentication
တို့ပဲဖြစ်ပါတယ်။
Full GitHub Actions Workflow
Production မှာ အသုံးပြုနေတဲ့ Workflow က ဒီလိုပုံစံပါ။
1name: Create Azure Key Vault and Upload Secrets2 3on:4 push:5 branches: [ main ]6 7permissions:8 id-token: write9 contents: read10 11jobs:12 terraform:13 name: create-azure-key-vault-and-upload-secrets14 runs-on: ubuntu-latest15 16 env:17 ARM_CLIENT_ID: ${{ secrets.AZURE_CLIENT_ID }}18 ARM_SUBSCRIPTION_ID: ${{ secrets.AZURE_SUBSCRIPTION_ID }}19 ARM_TENANT_ID: ${{ secrets.AZURE_TENANT_ID }}20 21 ARM_USE_OIDC: true22 ARM_USE_AZUREAD: true23 24 TF_VAR_tenant_id: ${{ secrets.AZURE_TENANT_ID }}25 TF_VAR_aks_keyvault_csi_object_id: ${{ secrets.AKS_KEYVAULT_CSI_OBJECT_ID }}26 27 steps:28 - name: Checkout Code29 uses: actions/checkout@v430 31 - name: Azure Login32 uses: azure/login@v233 with:34 client-id: ${{ secrets.AZURE_CLIENT_ID }}35 tenant-id: ${{ secrets.AZURE_TENANT_ID }}36 subscription-id: ${{ secrets.AZURE_SUBSCRIPTION_ID }}37 38 - name: Setup Terraform39 uses: hashicorp/setup-terraform@v340 41 - name: Terraform Init42 run: terraform init43 44 - name: Terraform Validate45 run: terraform validate46 47 - name: Terraform Plan48 run: terraform plan -out=main.tfplan49 50 - name: Terraform Apply51 run: terraform apply -auto-approve main.tfplanဒီ Workflow က Infrastructure Create လုပ်ဖို့အတွက်ဖြစ်ပါတယ်။
Dynamic Secret Mapping
Secret တွေကို Hardcode မလုပ်ဘဲ JSON Mapping File နဲ့ Dynamic Upload လုပ်ထားပါတယ်။
"secrets-map.json"
1[2 {3 "vault": "mbr-kv-dev",4 "secretName": "app1",5 "githubSecret": "DEV_APP1_ENV"6 },7 {8 "vault": "mbr-kv-dev",9 "secretName": "app2",10 "githubSecret": "DEV_APP2_ENV"11 },12 {13 "vault": "mbr-kv-uat",14 "secretName": "app1",15 "githubSecret": "UAT_APP1_ENV"16 },17 {18 "vault": "mbr-kv-production",19 "secretName": "app1",20 "githubSecret": "PRODUCTION_APP1_ENV"21 }22]ဒီ Design ရဲ့ အားသာချက်က Secret အသစ်ထပ်တိုးချင်ရင် JSON File ထဲမှာပဲ Add လုပ်လိုက်ရုံပါပဲ။ Workflow Logic ကို ပြန်ပြင်စရာမလိုတော့ပါဘူး။
Upload Secrets To Azure Key Vault
ဒီအပိုင်းကတော့ Secret Upload Logic ဖြစ်ပါတယ်။
1- name: Upload Secrets To Azure Key Vault2 env:3 DEV_APP1_ENV: ${{ secrets.DEV_APP1_ENV }}4 DEV_APP2_ENV: ${{ secrets.DEV_APP2_ENV }}5 6 UAT_APP1_ENV: ${{ secrets.UAT_APP1_ENV }}7 UAT_APP2_ENV: ${{ secrets.UAT_APP2_ENV }}8 9 PRODUCTION_APP1_ENV: ${{ secrets.PRODUCTION_APP1_ENV }}10 PRODUCTION_APP2_ENV: ${{ secrets.PRODUCTION_APP2_ENV }}11 12 run: |13 jq -c '.[]' secrets-map.json | while read item; do14 VAULT=$(echo "$item" | jq -r '.vault')15 SECRET_NAME=$(echo "$item" | jq -r '.secretName')16 GITHUB_SECRET=$(echo "$item" | jq -r '.githubSecret')17 18 SECRET_VALUE="${!GITHUB_SECRET}"19 20 if [ -z "$SECRET_VALUE" ]; then21 echo "Missing GitHub secret: $GITHUB_SECRET"22 exit 123 fi24 25 echo "Uploading secret: $SECRET_NAME to vault: $VAULT"26 27 az keyvault secret set \28 --vault-name "$VAULT" \29 --name "$SECRET_NAME" \30 --value "$SECRET_VALUE" \31 --output none32 doneဒီ Script က -
- JSON File Loop ပတ်မယ်
- Vault Name ယူမယ်
- Secret Name ယူမယ်
- GitHub Secret Name ယူမယ်
- Azure Key Vault ထဲ Upload လုပ်မယ်
ဆိုပြီး Dynamic Workflow နဲ့ အလုပ်လုပ်ပါတယ်။
Azure RBAC Design
ဒီ Architecture မှာ Identity နှစ်ခုရှိပါတယ်။
1. GitHub Actions Service Principal
GitHub Actions က Azure Key Vault ထဲ Secret တွေ Create/Update လုပ်နိုင်ဖို့ Key Vault Administrator Role ပေးထားပါတယ်။
ဘာလို့ Administrator ပေးတာလဲ?
ဘာလို့လဲဆိုတော့ GitHub Actions က Secret တွေကို Create/Update/Delete လုပ်ဖို့ လိုပါတယ်။ Read Only နဲ့ မလုံလောက်ပါဘူး။
ဒါကြောင့် -
1Key Vault AdministratorRole ပေးထားပါတယ်။
2. AKS User Assigned Managed Identity
AKS Pod တွေကတော့ Secret ဖတ်ဖို့ပဲလိုပါတယ်။
ဒါကြောင့် Managed Identity ကို Read Only Access ပဲပေးထားပါတယ်။
1Key Vault Secrets Userဒီလို Least Privilege Access ပေးထားတာက Production Security မှာ အရမ်းအရေးကြီးပါတယ်။
Important Identity Confusion (Object ID vs Client ID)
ဒီအပိုင်းမှာ လူတော်တော်များများ Confuse ဖြစ်တတ်ပါတယ်။
Terraform ထဲမှာတော့ -
1principal_idသုံးတာတွေ့ရမယ်။
ဒါပေမယ့် SecretProviderClass ထဲမှာတော့ -
1userAssignedIdentityIDသုံးထားပါတယ်။
တကယ်တော့ နှစ်ခုလုံးက Managed Identity တစ်ခုတည်းကို ရည်ညွှန်းတာပါ။
ဒါပေမယ့် Azure API တစ်ချို့က Object ID လိုချင်ပြီး တစ်ချို့က Client ID လိုချင်တာကြောင့် Naming မတူတာပါ။
ဥပမာ -
- Terraform Role Assignment → Principal/Object ID
- SecretProviderClass → Client ID
ဒါပေမယ့် Underlying Identity ကတော့ အတူတူပါပဲ။
ဒီအပိုင်းကို မသိရင် AKS CSI Driver Configuration မှာ Error တွေတက်တတ်ပါတယ်။
AKS Secrets Store CSI Driver
AKS မှာ Azure Key Vault Provider Addon Enable လုပ်လိုက်တာနဲ့ kube-system Namespace ထဲမှာ DaemonSet နှစ်ခု Run နေတာကို တွေ့ရပါလိမ့်မယ်။
1kubectl get daemonset -n kube-systemOutput:
1aks-secrets-store-csi-driver2aks-secrets-store-provider-azureသူတို့က Cluster Node တိုင်းမှာ Run နေတာဖြစ်ပြီး Azure Key Vault ကနေ Secret တွေကို Pull လုပ်ပေးပါတယ်။
CSI Driver ကို Worker တစ်ယောက်လိုယူဆလို့ရပါတယ်။
ဒါပေမယ့် သူ့ဘာသာသူ -
- ဘယ် Vault သုံးရမလဲ
- ဘယ် Identity သုံးရမလဲ
- ဘယ် Secret ယူရမလဲ
ဆိုတာ မသိပါဘူး။
ဒါကို SecretProviderClass က Instruction ပေးတာပါ။
Full SecretProviderClass
1apiVersion: secrets-store.csi.x-k8s.io/v12kind: SecretProviderClass3metadata:4 name: app1-dev5spec:6 provider: azure7 parameters:8 useVMManagedIdentity: "true"9 userAssignedIdentityID: {{ .Values.keyvault.userAssignedIdentityID | quote }}10 keyvaultName: {{ .Values.keyvault.name | quote }}11 tenantId: {{ .Values.keyvault.tenantId | quote }}12 objects: |13 array:14 - |15 objectName: app1-dev16 objectType: secret17 secretObjects:18 - secretName: app1-dev19 type: Opaque20 data:21 - objectName: app1-dev22 key: .envဒီ YAML ထဲက အရေးကြီးတဲ့အပိုင်းတွေကို Breakdown လုပ်ကြည့်ရအောင်။
useVMManagedIdentity
1useVMManagedIdentity: "true"ဒီ Setting က CSI Driver ကို Managed Identity သုံးပြီး Azure Key Vault Access လုပ်ခိုင်းတာပါ။
ဒီ Setting မထည့်ထားဘူးဆိုရင် CSI Driver က Azure Authentication မလုပ်နိုင်ပါဘူး။
userAssignedIdentityID
1userAssignedIdentityIDဒီကောင်က AKS Node Pool မှာ Assign လုပ်ထားတဲ့ Managed Identity Client ID ပါ။
CSI Driver က ဒီ Identity ကိုသုံးပြီး Azure Key Vault Access လုပ်ပါတယ်။
objects
1objects:ဒီထဲမှာ Vault ထဲက ဘယ် Secret ယူမလဲဆိုတာ သတ်မှတ်ထားပါတယ်။
1objectName: app1-dev2objectType: secretဒီမှာ "objectType" က Secret ဖြစ်တာကြောင့် Key Vault Secret ကို ယူမှာပါ။
secretObjects
ဒီအပိုင်းက အရမ်းအရေးကြီးပါတယ်။
1secretObjects:ဒီ Setting ကြောင့် Azure Key Vault Secret ကို Kubernetes Native Secret အဖြစ် Sync လုပ်ပေးပါတယ်။
ဒါကြောင့် Application တွေက Kubernetes Secret ကို ပုံမှန်အတိုင်း သုံးနိုင်သွားပါတယ်။
ဒီ Feature မသုံးရင် Application က CSI Mounted Path ကနေ File တိုက်ရိုက်ဖတ်ရပါမယ်။
ဒါက Existing Application တွေအတွက် အဆင်မပြေတတ်ပါဘူး။
Full Deployment YAML
1apiVersion: apps/v12kind: Deployment3metadata:4 name: app1-dev5 annotations:6 secret.reloader.stakater.com/reload: "app1-dev"7spec:8 selector:9 matchLabels:10 app: app1-dev11 template:12 metadata:13 labels:14 app: app1-dev15 spec:16 containers:17 - name: app1-dev-container18 image: "{{ .Values.image.repository }}:{{ .Values.image.tag | default .Chart.AppVersion }}"19 ports:20 - name: http21 containerPort: 300022 volumeMounts:23 - name: secret-env-volume24 mountPath: /usr/src/app/.env25 subPath: .env26 - name: secrets-store-inline27 mountPath: "/mnt/secrets-store"28 readOnly: true29 volumes:30 - name: secret-env-volume31 secret:32 secretName: app1-dev33 items:34 - key: .env35 path: .env36 - name: secrets-store-inline37 csi:38 driver: secrets-store.csi.k8s.io39 readOnly: true40 volumeAttributes:41 secretProviderClass: app1-devWhy Mount Two Volumes?
ဒီ YAML ကိုကြည့်တဲ့အချိန်မှာ လူတော်တော်များများ Confuse ဖြစ်တတ်ပါတယ်။
1secret-env-volumeနဲ့
1secrets-store-inlineဘာလို့ Volume နှစ်ခု Mount လုပ်ထားတာလဲ?
အကြောင်းရင်းက -
CSI Driver က Azure Key Vault ကနေ Secret Pull လုပ်ဖို့လိုပါတယ်။
ဒါအတွက်:
1secrets-store-inlineကိုသုံးပါတယ်။
ဒါပေမယ့် Application ကတော့ ".env" file အနေနဲ့ လိုချင်ပါတယ်။
ဒါကြောင့် Kubernetes Secret Sync ပြန်လုပ်ပြီး:
1secret-env-volumeကနေ ".env" file အနေနဲ့ Mount ပြန်လုပ်ထားတာပါ။
ဒီ Design က Existing Application တွေအတွက် အရမ်းအဆင်ပြေပါတယ်။
Stakater Reloader
ဒီအပိုင်းက Production မှာ မေ့ထားလို့မရတဲ့ အပိုင်းပါ။
Vault ထဲမှာ Secret Value ပြောင်းလိုက်ရုံနဲ့ Running Pod က Value အသစ်ကို မသိပါဘူး။
ဒါကြောင့် Reloader ကို သုံးပါတယ်။
1annotations:2 secret.reloader.stakater.com/reload: "app1-dev"ဒီ Annotation ကြောင့် Kubernetes Secret Change ဖြစ်တာနဲ့ Deployment ကို Rolling Restart လုပ်ပေးပါတယ်။
ဒီလိုလုပ်ထားတဲ့အတွက် -
- Zero Downtime
- Automatic Secret Refresh
- Better Automation
တို့ရရှိပါတယ်။
Full Secret Rotation Flow
Production မှာ Secret Value ပြောင်းတဲ့အချိန် ဘာတွေဖြစ်သွားလဲ Step By Step ကြည့်လိုက်ရအောင်။
Step 1 - Git Push
DevOps Engineer က Git Repository ထဲမှာ Secret Value Update လုပ်ပါတယ်။
Step 2 - GitHub Actions Trigger
Git Push ဖြစ်တာနဲ့ Workflow Trigger ဖြစ်ပါတယ်။
Step 3 - Azure Key Vault Update
GitHub Actions က Azure Key Vault ထဲမှာ Secret Value အသစ် Upload လုပ်ပါတယ်။
Step 4 - CSI Driver Fetch
AKS CSI Driver က Azure Key Vault ကနေ Value အသစ် Pull လုပ်ပါတယ်။
Step 5 - Kubernetes Secret Sync
CSI Driver က Kubernetes Secret ကို Sync ပြန်လုပ်ပါတယ်။
Step 6 - Reloader Detect
Reloader က Secret Change ဖြစ်တာကို Detect လုပ်ပါတယ်။
Step 7 - Rolling Restart
Deployment ကို Zero Downtime Rolling Restart လုပ်ပါတယ်။
Step 8 - Application Updated
Pod အသစ်တွေက Updated Secret Value ကို အသုံးပြုသွားပါတယ်။
Security Advantages
ဒီ Architecture ရဲ့ အဓိက Security Advantages တွေကတော့ -
- No Plain Text Secret In Git
- No Azure Credential Inside Pod
- Identity Based Authentication
- Better RBAC
- Environment Isolation
- Centralized Secret Management
- Automated Rotation
- Audit Logging
- Zero Long Lived Credential
တို့ပဲဖြစ်ပါတယ်။
Common Mistakes
ဒီ Architecture Build လုပ်တဲ့အချိန်မှာ တွေ့ရတတ်တဲ့ Mistake တချို့ကိုလည်း Share ပေးချင်ပါတယ်။
Using Kubernetes Secret Only
Base64 Encode လုပ်ထားတာကို Encryption ထင်နေတတ်ပါတယ်။
ဒါပေမယ့် Kubernetes Secret က Encryption မဟုတ်ပါဘူး။
Using Azure Client Secret Inside Pod
Pod ထဲမှာ Azure Credential ထည့်ထားတာက Security Risk အရမ်းများပါတယ်။
Managed Identity ကိုသုံးတာ ပိုကောင်းပါတယ်။
Using One Vault For Everything
Dev/UAT/Production Secret အကုန် Vault တစ်ခုထဲထည့်ထားတာက Production Risk များပါတယ်။
No Secret Rotation
Secret Rotation မလုပ်တာက Long Term Security Risk ဖြစ်လာနိုင်ပါတယ်။
Final Thoughts
Production Grade Secret Management ဆိုတာ ".env" file သိမ်းတာလောက်ပဲ မဟုတ်တော့ပါဘူး။
Identity RBAC Automation Rotation Audit Logging Security Environment Isolation
အဲ့ဒါတွေ အကုန်ပါလာပါတယ်။
ဒီ Article မှာ Share ပေးထားတဲ့ Architecture ကတော့ ကျွန်တော် Production AKS Environment တွေမှာ တကယ်အသုံးပြုနေတဲ့ Design ဖြစ်ပါတယ်။
ဒီလို Identity Based Secret Management Design ကို အသုံးပြုထားတဲ့အတွက် -
- Security ပိုကောင်းလာတယ်
- Manual Error လျော့သွားတယ်
- Automation ကောင်းလာတယ်
- Production Reliability ပိုကောင်းလာတယ်
လို့ ပြောလို့ရပါတယ်။
ဒီ Article ကနေ Knowledge တစ်ခုခုရခဲ့ရင် Share ပေးသွားပါဦးဗျာ။
Repository
GitHub Repository:
https://github.com/thaunghtike-share/terraform-azure-key-vault
Discussion
Join the conversation
How do you feel about this article?
Comments
Sign in to join the conversation
Sign in to be the first to comment!
Share Your Article
Share with your professional network
Recent Articles
Day 1 - Software Development ကို ပိုပြီးမြန်စေမယ့် CI/CD
Software တစ်ခုရေးပြီးပြီဆိုရင် "ငါ့စက်ထဲမှာတော့ အလုပ်လုပ်တယ်" ဆိုရုံနဲ့ မပြီးသေးပါဘူး။ User တွေသုံးမယ့် Server ပေါ်ရောက်...
Secure AWS ECR Github Action Using OIDC
Modern DevOps နှင့် Cloud Security တို့မှာ အဓိကဖြစ်လာသည့် Authentication System ယနေ့ခေတ် DevOps, Cloud Engineering, CI/C...
Manual vs Automated Infrastructure: Why "useradd" Still Matters in the Terraform Era
DevOps careerကို လျှောက်နေတဲ့သူတိုင်း Terraform၊ Ansible စတဲ့ Infrastructure as Code (IaC) tools တွေရဲ့ အလုပ်လုပ်နိုင်စွ...

From Surviving to Thriving
“AI ကြောင့် developer အလုပ်ပျောက်သွားမလား?” ဆိုတဲ့ မေးခွန်းကို Junior developer တိုင်း စဉ်းစားဖူးကြမှာပါ။ ဈေးကွက်အခြေအနေ...
AWS - Global Infra
AWS Global Infra AWS Global Infra & Service Type ဆိုတဲ့ ခေါင်းစဉ်နဲ့ ၂၀၂၅ ဒီဇင်ဘာမှာရေးထားဖူးတဲ့ article ကို အရင်ဆုံး ဖတ...